
1,280 words, 7 minutes read time.

3D printing precise caps and lids often requires understanding and accurately measuring threads. Whether you’re replicating an existing lid or creating a custom fit, getting the thread specifications right can make or break your project. This guide breaks down the process, ensuring your designs lock into place with confidence.
Why Measuring Threads Matters
Threads are the spiral grooves on caps or lids that allow them to screw onto containers securely. Mismatched threads can result in loose or dysfunctional parts. Precise thread measurements ensure compatibility and durability in your 3D-printed projects. Understanding these small but crucial details can also save time and resources, preventing failed prints and material wastage.
Threads come in different forms, such as metric threads (measured in millimeters) and imperial threads (measured in inches). Each standard has its specific uses, so identifying the right type for your project is critical. Moreover, factors like thread pitch, angle, and diameter directly impact how your printed cap or lid will interact with the container. By honing these measurements, you set the foundation for a flawless fit and long-lasting design.
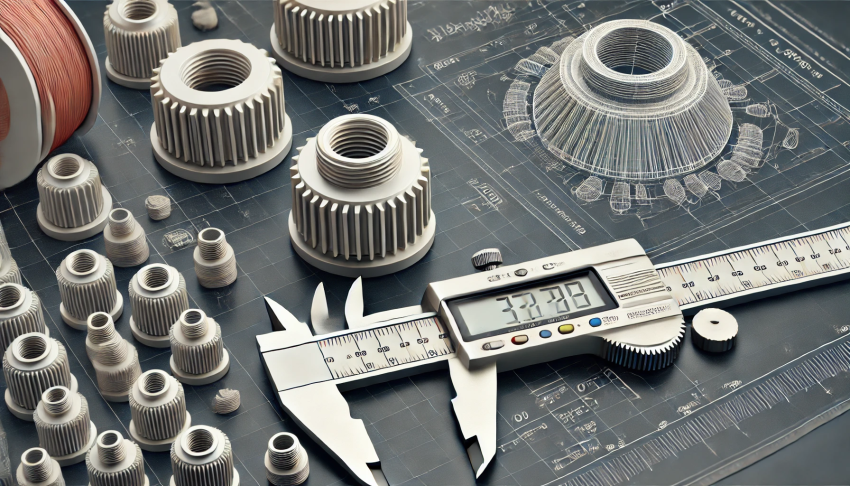
Tools You’ll Need
To measure threads accurately, you need the right tools. These are some essentials:
- Calipers: A precision instrument used to measure diameters, depths, and widths. Digital calipers are highly recommended for their ease of use and accuracy.
- Thread gauges: Devices used to identify thread pitch and size, crucial for matching the right thread specifications.
- Ruler or tape measure: While less precise than calipers, these can be handy for initial measurements or larger components.
- Digital software: CAD programs like Fusion 360 or Tinkercad allow you to model threads accurately and make adjustments as needed.
These tools, combined with a systematic approach, will ensure that your measurements are spot-on. Before you begin, make sure your tools are calibrated and in good condition to avoid errors.
Step-by-Step Process
1. Measure the Outer Diameter (OD)
The outer diameter (OD) is the widest part of the threads on the cap or lid. It determines the overall size of the threads and is essential for ensuring a proper fit. Using calipers, measure from one side of the thread to the other, ensuring the caliper arms are parallel to the thread axis. Record this measurement, as it will be the basis for your thread’s dimensions in the CAD software.
For example, if the OD measures 32 mm, this value becomes the foundation for designing your cap’s thread. Accurate OD measurement ensures that the cap fits snugly over the container’s neck without excessive slack.
2. Measure the Inner Diameter (ID)
For threaded containers, the inner diameter (ID) represents the narrowest part of the internal threads, often called the “root.” This measurement ensures the cap’s threads will align properly with the container’s neck. Position the calipers inside the threaded opening and measure the distance between the two innermost points.
This step is crucial because an incorrect ID can lead to a cap that either wobbles or fails to screw on entirely. In most cases, allowing a slight clearance of 0.1–0.2 mm will provide a snug yet functional fit.
3. Determine Thread Pitch
Thread pitch refers to the distance between consecutive threads. To measure this, use a thread gauge for accuracy. Alternatively, measure the distance between the peaks of two adjacent threads with calipers and divide by the thread count per unit length.
For instance, if the pitch is 4 mm, this value will dictate how the threads are spaced on your 3D model. Correct thread pitch ensures smooth screwing and unscrewing, preventing cross-threading or jamming.
4. Assess Thread Angle
The thread angle is the angle between the flanks of a single thread. Most standard threads have a 60-degree angle. Verify this using a protractor or reference guide. For specialized threads, consulting manufacturer specifications or technical documents may be necessary.
5. Test Fit with a 3D-Printed Sample
Before committing to the final print, design a small test piece featuring the measured threads. Print this sample and test its fit on the container. This step saves material and time, allowing you to tweak the design if necessary.
6. Design Threads in CAD Software
With your measurements in hand, open your preferred CAD software. Start by creating a cylinder with dimensions matching the OD and ID. Define the thread pitch and angle, ensuring they align with your measurements. Many CAD programs offer built-in thread generators, which simplify this process.
Consider adding parameters for key dimensions like height, diameter, and thread pitch. This allows you to adjust the design easily without starting from scratch.
7. Add Clearances and Tolerances
To ensure the cap threads smoothly onto the container, incorporate clearances and tolerances into your design. For instance, adding 0.1–0.2 mm clearance between the cap and container threads accommodates minor variances in printing or material shrinkage.
8. Select the Right Material
The choice of filament affects thread performance. PLA is easy to print and suitable for low-stress applications. ABS offers greater strength and flexibility but may require adjustments for shrinkage. Nylon is an excellent choice for high-durability threads but can be challenging to print.
Advanced Techniques for Thread Design
Using Parameters for Dynamic Adjustments
Parameters in CAD software allow for flexible design adjustments. Define parameters for thread pitch, diameter, and wall thickness. If you need to tweak the design after testing, changing these parameters automatically updates the model, saving time and effort.
Creating Multi-Start Threads
Multi-start threads, which have two or more thread paths running parallel, can be useful for faster screwing and unscrewing. These are especially helpful for caps that need frequent removal.
Chamfering and Filleting
Adding chamfers or fillets to thread edges enhances durability and ease of use. Chamfers help guide the cap onto the container, while fillets reduce stress concentrations, prolonging the life of the threads.
Using Spiral Paths
For complex designs, consider using a spiral path to create custom thread profiles. This technique allows for unique thread geometries, providing better grip or specialized functionality.
Tips for Accurate Measurements
- Account for Tolerances: Threads often require slight clearance to function properly. Add a small tolerance (e.g., 0.1–0.2 mm) to your design.
- Consider Material Shrinkage: Some filaments, like ABS, may shrink as they cool. Compensate for this in your design.
- Use Thread Standards: Familiarize yourself with thread standards like ISO Metric or Unified Thread Standard to streamline your design process.
- Verify with Digital Tools: Many CAD programs offer simulation tools to verify thread fit and performance before printing.
- Optimize Print Settings: Adjust layer height, wall thickness, and infill density to ensure the threads print cleanly and withstand repeated use.
Common Mistakes and How to Avoid Them
Overlooking Tolerances
Failing to account for tolerances can result in a cap that’s too tight or too loose. Always add a small clearance to accommodate variations in printing and material properties.
Ignoring Material Properties
Different filaments behave differently. For instance, PLA is rigid but brittle, while ABS is flexible but prone to shrinkage. Choose a material that suits the intended use of your cap.
Skipping Test Prints
Test prints are essential for verifying thread fit and function. Skipping this step can lead to wasted materials and time if the final design doesn’t work as intended.
Using Incorrect Thread Standards
Using mismatched thread standards can cause compatibility issues. Ensure your design aligns with the standards of the container you’re working with.
Conclusion
Measuring threads for 3D printing caps might seem daunting at first, but with the right tools and a systematic approach, it becomes a straightforward task. By following these steps and testing your designs, you can ensure a perfect fit every time. Advanced techniques, such as using parameters and spiral paths, further enhance your capabilities, enabling you to tackle more complex projects. Happy printing!